CI/CD Integration and Installation #
Coderrect and Jenkins Integration (Using Jenkinsfile) #
This tutorial shows how to integrate Coderrect with Jenkins, the most popular CI/CD platform.
Coderrect is a static analysis tool for C/C++ code. Unlike popular tools such as Cppcheck and Clang static analyzer, one of the powerful features of Coderrect is the detection of concurrency races caused by code using explicit multi-thread APIs (e.g. PThread, std::thread) or implicit parallel APIs (e.g. OpenMP).
Besides running Coderrect to scan the local source code via the command line, you can easily integrate it with Jenkins to include it in your CI/CD pipeline so that Coderrect can be triggered automatically by a pull request, a code check-in, or a scheduled nightly build.
Overview
The diagram below illustrates the interaction among components in Coderrect-Jenkins integration.
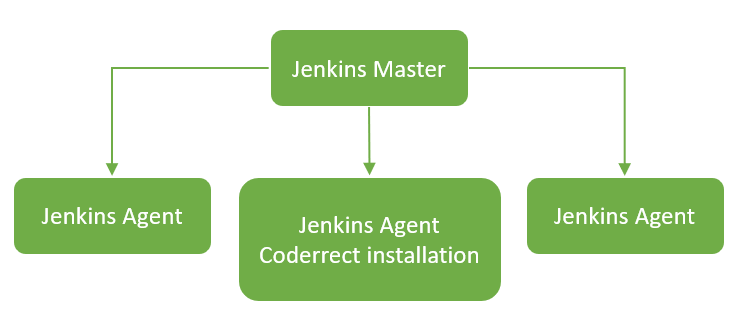
When a build is scheduled Jenkins master asks Jenkins agents to prepare the source code (usually pull the latest code from a source control system), build the project, test and analysis the program.
Upon receiving the request from Jenkins Master, the Jenkins agent runs Coderrect installed locally to analyze the code and report discoveries back to the master.
Install Coderrect
The first step is to install the Coderrect package to the Jenkins agent machine. Note that Coderrect just supports Linux for now.
- Download the latest version of Coderrect from here (the source can be found here).
- Unpack the downloaded tarball.
- Add /path/to/coderrect-installation/bin into PATH.
Install Coderrect Jenkins Plugin
You can download Coderrect Jenkins plugin here. Then go to the “Advanced” tab of “Manage Plugins” page.
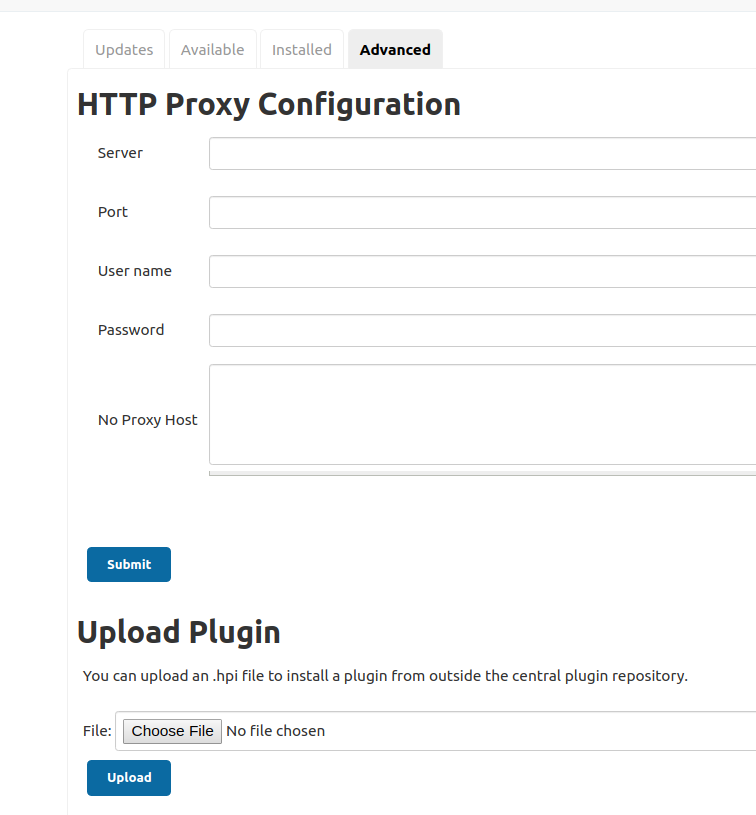
For “Upload Plugin”, click “Choose File” to select the downloaded coderrect.hpi.
Create a multi-branch project
Now we can create a multi-branch project in Jenkins.
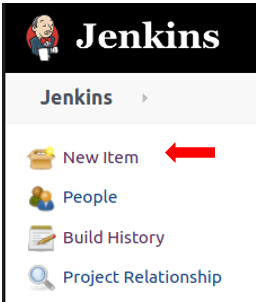
Go to Jenkins portal and click “New Item“.
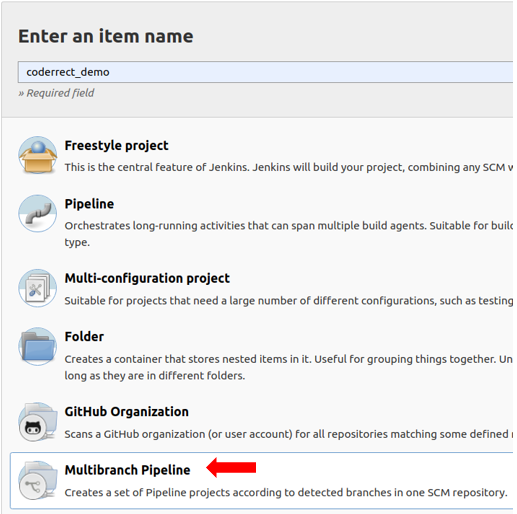
Enter the project name and select “Multibranch Pipeline”
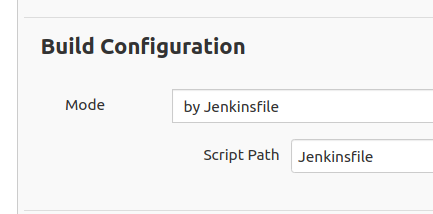
Set up the source control and build information. Make sure you use Jenkinsfile to control the build pipeline.
Create Jenkinsfile
We already created a project in Jenkins. To let Jenkins know how to build, test and analyze the code, we have to create a file called Jenkinsfile under the root directory of your repository.
pipeline {
    agent any

    stages {
        stage('Build') {
            steps {
                sh "coderrect make"
            }
        }

        stage('Analysis') {
            steps {
                publishCoderrect ""
            }
        }
    }
}
The Jenkinsfile above defines a pipeline with two stages. The “build” stage builds the project and runs coderrect to analyze the generated binary. The “analysis” stage reports the analysis results to the master.
You may be aware that the command “publishCoderrect” has a parameter whose value is “” in our example. What is it? It is the relative path (to the project root directory) where you executes “coderrect”. We execute “coderrect” immediately under the project root so that we specify its value to “”.
If we execute “coderrect” under a directory rather than the project root we need to set up this parameter correctly. For example, the following figure shows typical build steps for a cmake-based project:
# we are under the project root directory
mkdir build
cd build
cmake ..
coderrect make
In this case you execute “coderrect” under project-root/build. You need to set the build directory to “build”.
#pipeline {
    agent any

    stages {
        stage('Build') {
            steps {
                sh "mkdir build && cd build && cmake .. && coderrect make"
            }
        }

        stage('Analysis') {
            steps {
                     publishCoderrect "build"
            }
        }
    }
}
Now we are done! We can go to the project dashboard and manually trigger a build.
Trigger a Build
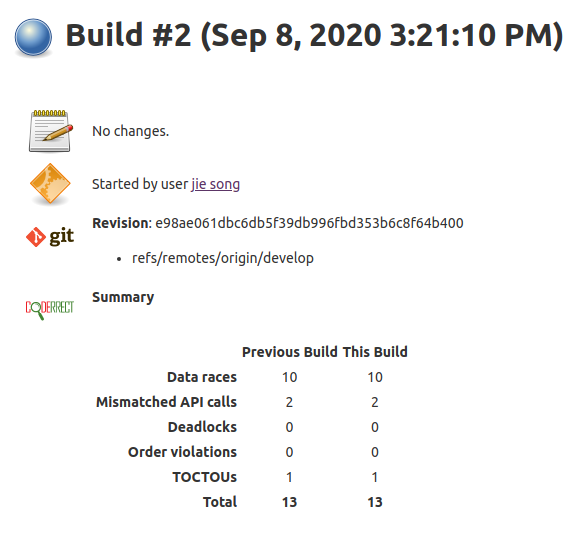
Coderrect adds a section into the build summary page. The section shows the number of races in different categories for this build and the previous build. For example, the demo project above has 13 data races.
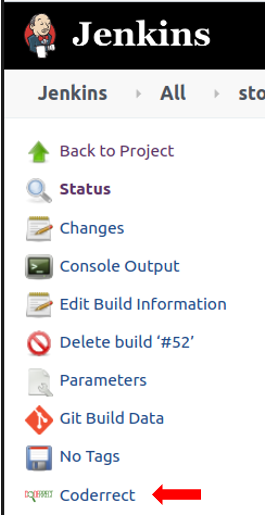
You can click the “Coderrect” item in the navigation bar to see details.
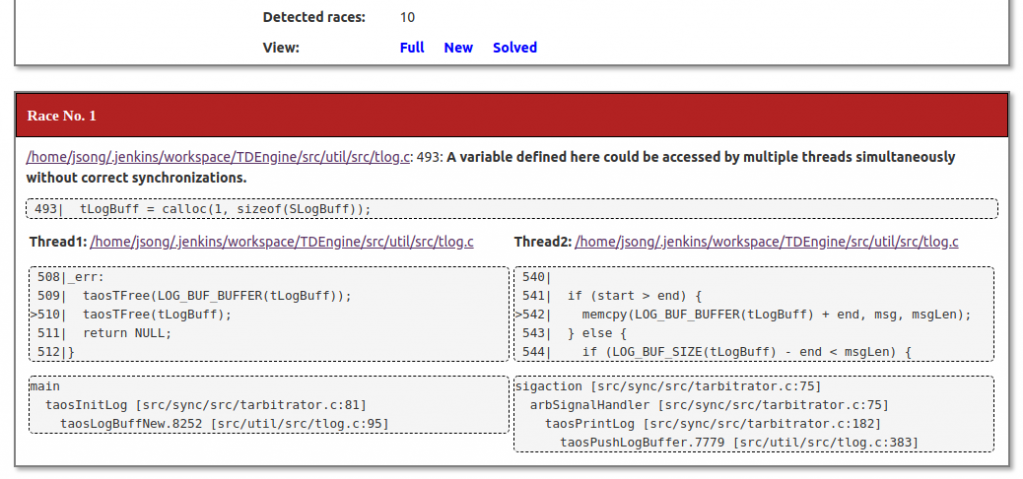
The detail report has three views – full, new and solved. The “full” view shows all races found from the current build. The “new” view shows just races introduced by the new committed code since previous build. The “solved” view shows races fixed by the new code.
I hope you enjoy this post. Please send to feedback@coderrect.com if you have any feedback.
Coderrect and Jenkins Integration (Using freestyle project) #
This tutorial shows how to integrate Coderrect with Jenkins, the most popular CI/CD platform.
Coderrect is a static analysis tool for C/C++ code. Unlike popular tools such as Cppcheck and Clang static analyzer, one of the powerful features of Coderrect is the detection of concurrency races caused by code using explicit multi-thread APIs (e.g. PThread, std::thread) or implicit parallel APIs (e.g. OpenMP).
Besides running Coderrect to scan the local source code via the command line, you can easily integrate it with Jenkins to include it in your CI/CD pipeline so that Coderrect can be triggered automatically by a pull request, a code check-in, or a scheduled nightly build.
Overview
The diagram below illustrates the interaction among components in Coderrect-Jenkins integration.
When a build is scheduled Jenkins master asks Jenkins agents to prepare the source code (usually pull the latest code from a source control system), build the project, test and analysis the program.
Upon receiving the request from Jenkins Master, the Jenkins agent runs Coderrect installed locally to analyze the code and report discoveries back to the master.
Install Coderrect
The first step is to install the Coderrect package to the Jenkins agent machine. Note that Coderrect just supports Linux for now.
- Download the latest version of Coderrect from here (the source can be found here).
- Unpack the downloaded tarball.
- Add /path/to/coderrect-installation/bin into PATH.
Install Coderrect Jenkins Plugin
You can download Coderrect Jenkins plugin file here. Then go to the “Advanced” tab of “Manage Plugins” page.
For “Upload Plugin”, click “Choose File” to select the downloaded coderrect.hpi.
Create a Freestyle project
Now we can create a freestyle project in Jenkins.
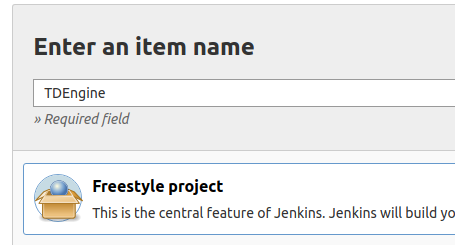
Go to Jenkins portal and click “New Item“.
Enter the project name (TDEngine here) and select “Freestyle project”
Set up the source control and build information. For the build stage, I create the following script commands
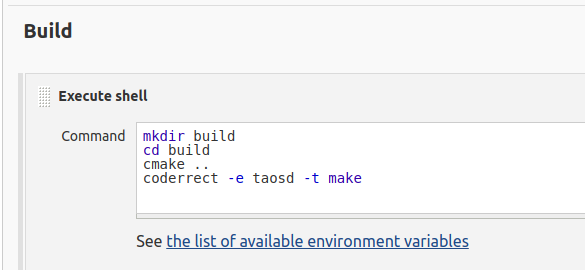
The last step “coderrect -e taosd -t make” tells coderrect to
- Execute “make” to build binaries
- Analyze an executable called “taosd” to detect races
- Generate a terminal-based race report besides the default HTML-based report
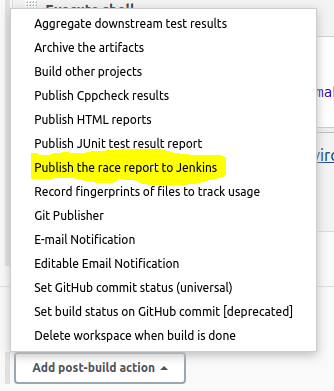
Set up the post-build stage by choosing “Publish the race report to Jenkins”
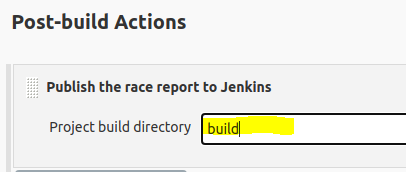
Since we run “coderrect” under the project_root/build, we specify a relative path “build” so that coderrect knows where to find the race report.
You are ready to go ffter you click “Save”!
Trigger a Build
Coderrect adds a section into the build summary page. The section shows the number of races in different categories for this build and the previous build. For example, the demo project above has 13 data races.
You can click the “Coderrect” item in the navigation bar to see detail report.
The detail report has three views – full, new and solved. The “full” view shows all races found from the current build. The “new” view shows just races introduced by the new committed code since previous build. The “solved” view shows races fixed by the new code.

I hope you enjoy this post. Please send to feedback@coderrect.com if you have any feedback.
Github CI/CD Integration #
If you are already running a CI/CD service on Github, it is easy to add Coderrect to your workflows. In a nutshell, add the following to .github/workflows/ci.yml
- name: coderrect setup
        run: |
            wget https://public-installer-pkg.s3.us-east-2.amazonaws.com/coderrect-linux-1.1.3.tar.gz
            tar zxf coderrect-linux-1.1.3.tar.gz
            echo "$PWD/coderrect-linux-1.1.3/bin" >> $GITHUB_PATH
- name: make
       run: coderrect -analyzeAllBinaries make
- name: coderrect check
        run: coderrect -publishResults
Background
Continuous Integration/Continuous Delivery (CI/CD) is a common practice now for developing software. In CI, typically tests and checks are run against every pull request and code commit to ensure the new code changes do not break anything or introduce new bugs. CI makes it easier to fix bugs quickly and often.
If your code is hosted on Github, you can create custom CI/CD workflows directly in your GitHub repository with GitHub Actions. All you need is to add a .yml file under .github/workflows/ of your Github repo.
As an example, Redis has a ci.yml file with the following content:
name: CI
on: [push, pull_request]
jobs:
    test-ubuntu-latest:
        runs-on: ubuntu-latest
        steps:
          - uses: actions/checkout@v2
          - name: make
            run: make
          - name: test
            run: |
                sudo apt-get install tcl8.5
               ./runtest --verbose
         - name: module api test
            run: ./runtest-moduleapi --verbose
With the configuration above, Github CI will build and test Redis upon every code push and pull request. If the build is successful and the tests are all passed, Github will show a green tick associated with the commit.
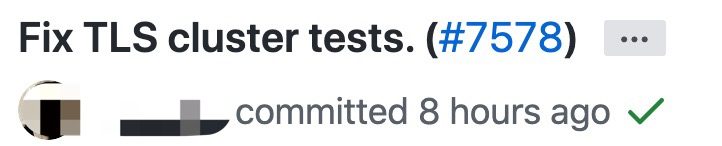
Otherwise, if the build or any test fails, you will see a red cross:

Integrating Coderrect into Github CI
To run coderrect in the Github CI, in ci.yml, simply add the following three steps:
# Step 1: download coderrect and add to path
- name: setup coderrect
        run: |
           wget https://public-installer-pkg.s3.us-east-2.amazonaws.com/coderrect-linux-0.8.0.tar.gz
           tar zxf coderrect-linux-0.8.0.tar.gz
           echo "::add-path::$PWD/coderrect-linux-0.8.0/bin"
# Step 2: build and run coderrect
- name: make
        run: coderrect -analyzeAllBinaries make
# Step 3: coderrect results
- name: coderrect check
        run: coderrect -publishResults
In Step 1, coderrect is setup;
In Step 2, the flag -analyzeAllBinaries tells Coderrect to check all the build targets;
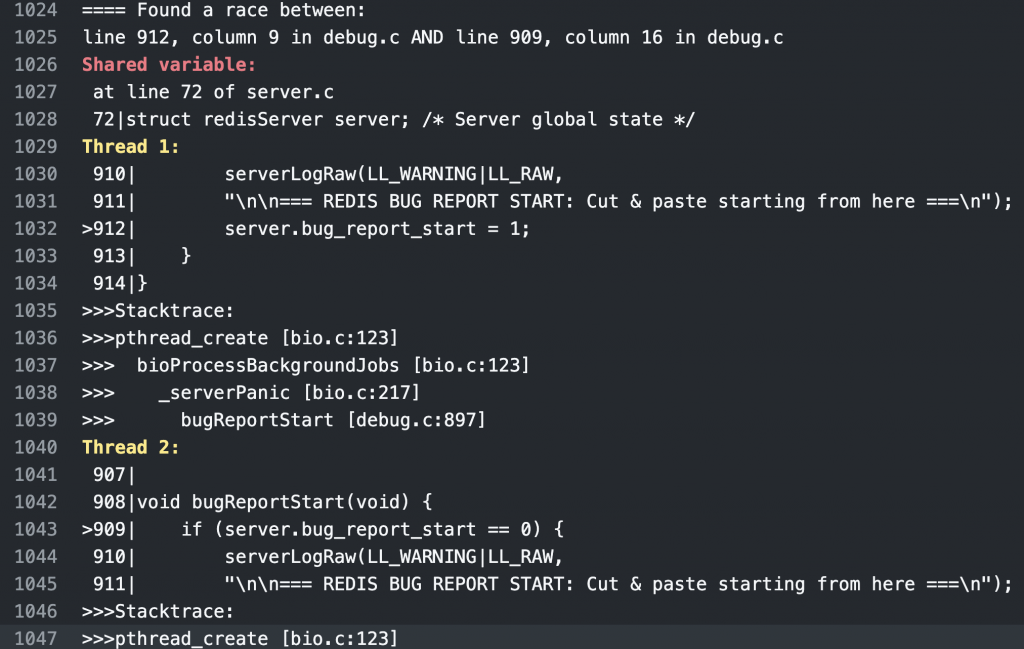
In Step 3, if any race is detected the results will be reported in the CI terminal. A red cross sign will be shown, indicating potential race hazards found by Coderrect:
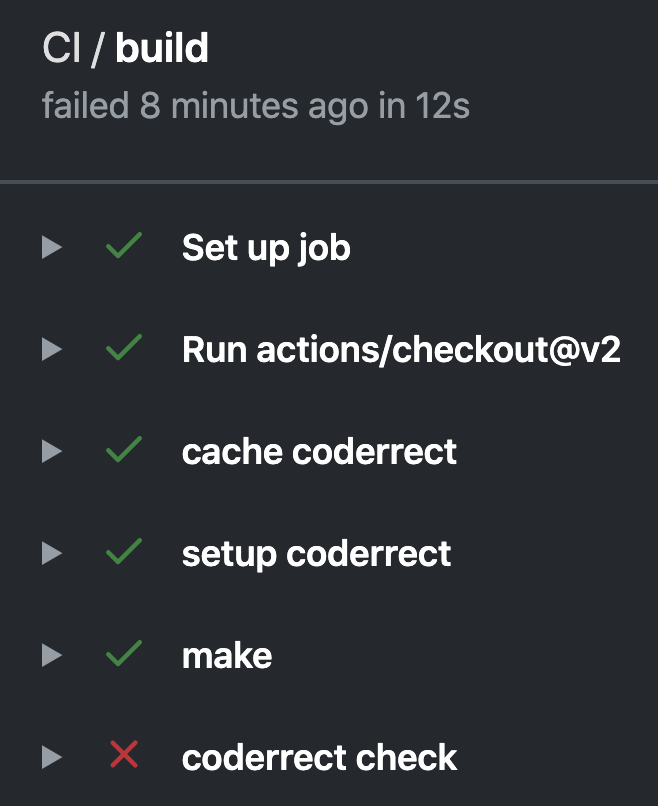
To see the detailed race information, just click the arrow sign to expand it:
Cache the downloaded Coderrect
Coderrect only needs to be downloaded once for Github CI. To cache the downloaded Coderrect package, simply add the following to ci.yml.
- name: cache coderrect
    id: cache-coderrect
    uses: actions/cache@v2
    with:
        path: coderrect-linux-0.8.0
        key: ${{ runner.os }}-coderrect

- name: setup coderrect
    if: steps.cache-coderrect.outputs.cache-hit != 'true'
A full example is available at here.
Installing Coderrect with Spack #
Spack is an increasingly popular package manager for Linux and macOS that eliminates the difficulties of managing complex software dependencies. Spack is especially popular in the high performance computing community. Spack won the prestigious R&D 100 Award in 2019 and is the official deployment tool of the ExaScale Computing Project which is tasked finding the tools and systems to support the next generation of ExaScale super computers in the U.S. Spack can even be used to set up a cloud-HPC cluster in AWS.
Prerequisites
This tutorial assumes you already have Spack installed. If you are new to Spack, we recommend following Spack’s Getting Started Guide.
Installing Coderrect with Spack
First download and add the Coderrect Spack repository to your local machine.
$ wget https://github.com/coderrect-inc/coderrect-spack/archive/master.zip
$ unzip master.zip && rm master.zip
$ mv coderrect-spack-master coderrect-spack
$ spack repo add coderrect-spack
Once the repo is registered, Spack makes its easy to install and load the Coderrect tool.
$ spack install coderrect
$ spack load coderrect
Coderrect is now installed and ready to use. Spack really does make things simple!
Check out the Coderrect Quick Start page or some of the other tutorials to see examples of how to use the Coderrect tool.


